Getting an extruder to work is one challenge. Getting it to work reliably is another entirely. After months of fighting jams, inconsistent flow, and mysterious temperature issues, I developed a systematic troubleshooting process. This guide documents the solutions that worked for me and should help anyone struggling with similar problems.
Temperature: The Foundation of Everything#
Temperature problems caused more extrusion failures than any other issue. Get this wrong, and nothing else matters.
Choosing the Right Thermistor#
Not all thermistors are created equal. They worked best when measuring temperatures near the middle of their specified range, where they operated nearly linearly with high resolution. This made it straightforward for the electronics to determine actual temperature.

I generated lookup tables using the script from the RepRap wiki to compare three common thermistors. The critical issue: thermistors lost resolution at temperature extremes. Each had a turning point where the readings became too coarse for accurate measurement.
For the three thermistors I tested at 240°C:
- Thermistor 1: 4.9°C per digital step
- Thermistor 2: 3.2°C per digital step
- Thermistor 3: 2.9°C per digital step
This low resolution wreaked havoc with PID temperature control. If the thermistor changed by 5°C per digital step, the PID controller could never stabilize because the next reading might jump significantly higher, causing the controller to turn the heater completely off instead of gradually reducing power for steady-state operation.
Using Thermistor 1, I set my extruder to 190°C. The temperature ramped to 189°C, then instantly jumped to 195°C. The PID shut off completely. As the extruder cooled, the temperature fell to 186°C before the heater reactivated. By the time the thermistor registered rising temperature again, the actual temperature had dropped to 179°C.
The solution: select a thermistor with its best precision range matching your target extrusion temperature. Before purchasing, check the datasheet and run the RepRap temperature lookup script to verify the resolution at your working temperature. For ABS and PLA printing at 220-250°C, Thermistors 2 and 3 provided adequate resolution.
Thermistor Placement#
Even with the right thermistor, placement mattered enormously. Mount it as close to the nozzle tip as possible, wrapped tightly with Kapton tape for good thermal contact. This gave the most accurate reading of actual nozzle temperature, not just the heater block temperature.
I had good results with temperatures around 243°C for ABS with a heated bed. Without a heated bed, lower temperatures of 220-230°C might work, but I found higher temperatures necessary for consistent flow.
Warning signs of temperature problems: popping, hissing, or steam from the extruder indicates too hot; uneven flow or periodic jamming indicates too cold; filament grinding without feeding indicates insufficient melt.
Preventing Contamination: The Filament Wiper#
Dust, hair, and microscopic debris on filament caused more jams than you’d expect. A simple wiper solved this problem. Cut a strip from lint-free cloth, wrap it around the filament before it reaches the extruder, and secure with a zip tie around the filament. Use a second zip tie to anchor the cloth to the frame.
Position the wiper where filament naturally feeds through. It doubles as a guide, keeping the filament path consistent while cleaning debris off the surface.
Cleaning a Clogged Nozzle#
If plastic extrudes sideways, in an oval pattern, or thinner than expected, you likely have debris inside the barrel.
Cleaning procedure: Disassemble while cool. Secure the barrel properly using a drill chuck or drill press; a vise will crush and potentially split brass barrels. Remove the nozzle, heating the assembly if needed to soften residual plastic. Clean thoroughly by burning out plastic with a torch or heat gun, then use drill bits starting small and working up. Never force a drill bit or you’ll damage the precision orifice. Work from both ends of the barrel.
Check for damage by inspecting the nozzle orifice with magnification. If it’s deformed or scored, replace or re-drill it. Reassemble carefully without overtightening because brass threads strip easily.
Prevention is better than cure. The filament wiper mentioned above prevents most clogs entirely.
Extruder Alignment: The Pinch Wheel#
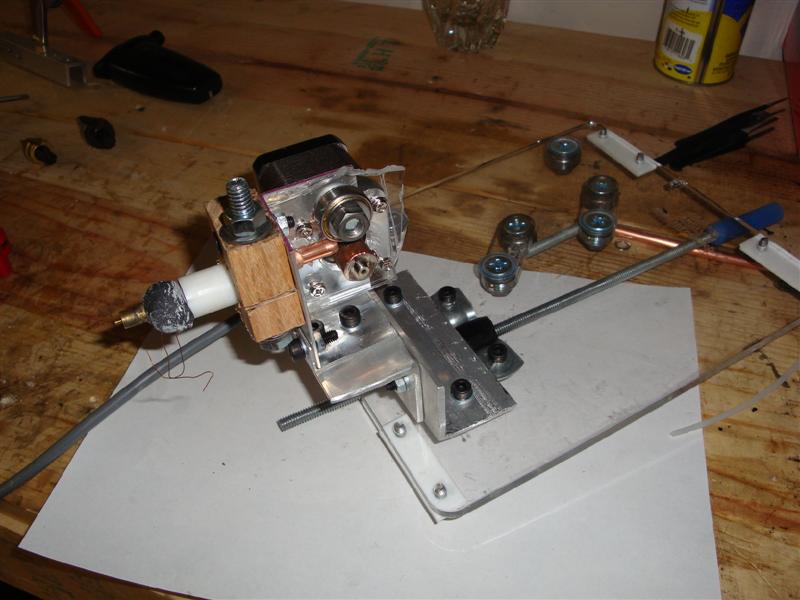
For pinch-wheel extruders, proper grip spacing is critical. Too much grip deforms filament, causing jams. Too little grip causes filament to slip and grind, creating shavings that cause blockages.
Recommended spacing: approximately 2-2.5mm between idler wheel and grip gear depending on your specific extruder design.
Adjustment procedure using a drill bit: Loosen motor mounting bolts enough to allow slight sliding. To expand the gap, insert your target-size drill bit into the filament path and turn the motor manually to feed it through so the motor self-centers at the correct spacing. To decrease the gap, insert a smaller drill bit and slide the motor against it. Tighten mounting bolts while maintaining pressure, then test with actual filament.
Proper alignment usually requires a few iterations. The filament should feed smoothly with no visible deformation.
Thermal Barrier Issues: The Long Melt Zone#
If you’ve addressed temperature, contamination, clogs, and alignment but still get jams, the problem might be your thermal barrier.
When feeding filament slowly, the entrance to the barrel can heat enough to soften the filament prematurely. This creates a “plug” of softened plastic that can’t be pushed through effectively. The plastic may even flow backward out of the PTFE thermal barrier, deforming and eventually destroying it.
Solutions: Add a small fan blowing directly on the thermal barrier to maintain a sharp thermal gradient. Ensure the PTFE barrier is long enough to create a proper thermal break. Consider using a water-cooled or air-cooled heat break. Check that the PTFE isn’t compressed or deformed. Increase hotend temperature slightly to reduce pressure required for extrusion, preventing backflow.
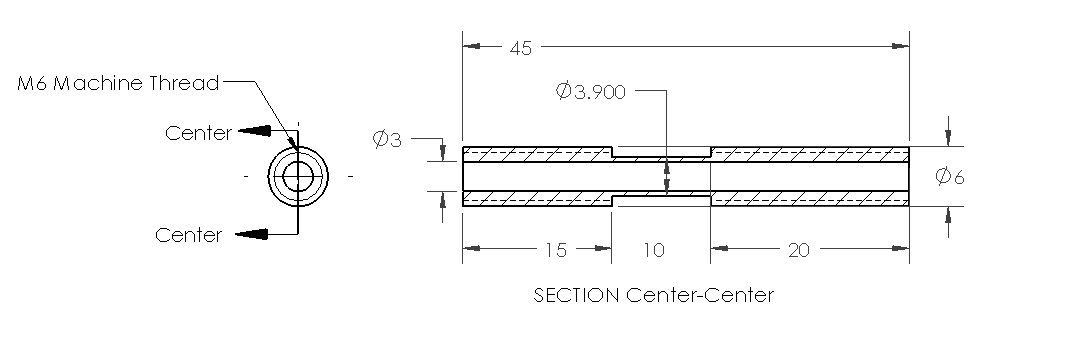
This CAD drawing shows a proper thermal barrier design. The key is maintaining a significant length of cool zone between the heater block and the filament drive mechanism.
Systematic Troubleshooting Process#
When encountering extrusion problems, work through these steps in order:
- Verify temperature readings: Check thermistor placement and calibration
- Clean the filament path: Install or check the filament wiper
- Inspect the nozzle: Check for clogs or damage
- Check mechanical alignment: Verify pinch wheel spacing
- Test the thermal barrier: Look for signs of heat creep or deformation
- Try different filament: Some batches have diameter or composition issues
If problems persist after addressing all these areas, consider trying different filament from another supplier. Diameter variations and contamination in the filament itself sometimes cause problems no amount of calibration can fix.
Editor’s Note (2025): This article combines troubleshooting knowledge from 2009-2010. Modern hotends have solved many of these issues with all-metal heat breaks, better heat sinks, and much more reliable thermistors. However, the fundamental principles remain the same: proper temperature control, clean filament paths, correct mechanical alignment. The language has been updated for clarity while preserving the technical details that were hard-won through extensive experimentation.